In this article, we will learn how you can disable firewalls on Windows 11. A Firewall is an element that comes with Microsoft Windows that holds our systems safe from all types of malware and threats to networks. This particular software is made to stop unauthorized users from accessing your resources and files on your PC.
Windows Defender Firewall which is part of the Microsoft Security suite of products is designed to protect your PC from threats external to it like malware and viruses from gaining access to your system. Windows Defender Firewall is an excellent alternative to commercial firewall software. It should be used in conjunction with other firewalls and be turned on.
In the event that you have installed a commercial firewall application, Windows Defender Firewall will automatically detect it and shut down itself, allowing other software to secure your PC. If you don’t have another firewall software installed the Windows Defender Firewall will automatically determine that no firewall software has been installed and will enable it to activate.
In certain situations, Windows Defender Firewall may hinder legitimate applications you would like to connect via the web. If you are experiencing similar issues, it is possible to be able to temporarily turn off the Windows firewall in order to permit applications to function.
However, finding an approach to allow an application to pass through the firewall is safer than completely disabling the firewall. If you disable the Windows firewall, you make your system open to attacks as well as other unwanted applications.
Also Read- Best Free Firewall Software For Windows 11
Steps to Disable Windows 11 Firewall
The removal of this Windows 11 firewall is a sensible option if you’re installing a different firewall on your computer. If that’s not the case, then your computer could be infected by malicious software, which could cause all kinds of problems on the device. Let’s Check out the step-by-step guide to Disable firewalls in Windows 11.
- Press Windows + I key to open windows 11 settings.
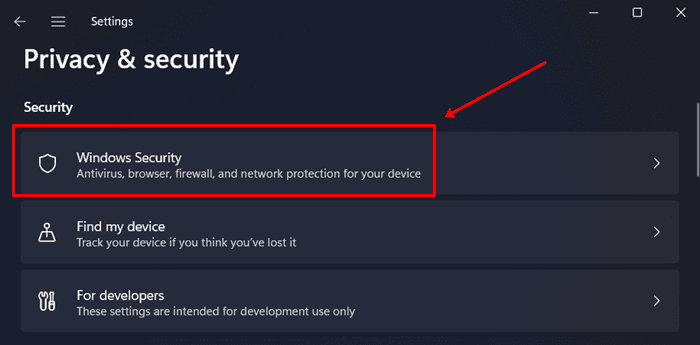
- In the left sidebar of the Settings app, click on Privacy & security.
- Now on the right side, click on Windows Security. You will find it under the Security section.
- On the next screen, click on Open Windows Security > Windows Defender (Windows Security).
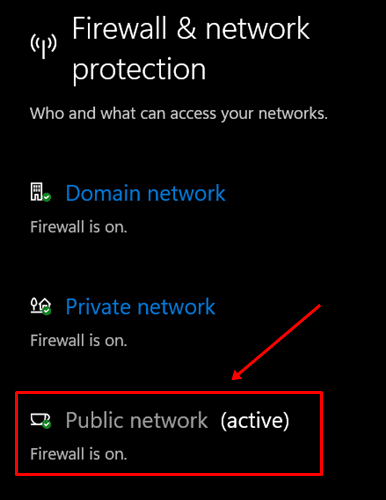
- You will see various security options here. Click on Firewall & network protection option.
- Here, click on Public Network. If it has Active written beside it, then it means that the firewall is enabled.
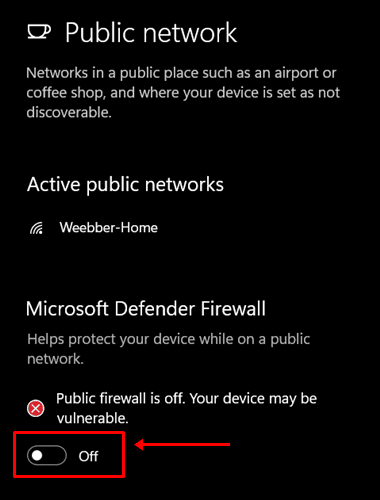
- Toggle this option to Disable Windows Defender Firewall and you will have successfully disabled the firewall.
- When you disable the Windows 11 Firewall, you will see a message on the screen, Public firewall is off. Your device may be vulnerable.
It is simple to disable Windows 11 Firewall. You can also easily disable it at any time. You can disable Windows Firewall easily or disable firewall for a particular app using the steps above. We also covered the steps required to activate the firewall. You can disable Windows Firewall and re-enable it by following the steps.


